Friday, 3 October 2014

Purple Reign, Purple Reign!

Goooood evening!!

Now as much as I love summer (and all that warm sunshine when we actually get it!) Autumn is definitely my favourite time of year. The cold, crisp days with crunchy leaves on the ground & snuggly layers make me so happy! One of my favourite things about this time of year is the change in make up palette, with much darker yet warmer shades being used. Because of this, I thought it would be a good time to discuss some of my favourite purple products, as this is a colour that I shall be using a lot over the next few months.


I'll start with the lips, and there are 2 products in my collection which stand out the most to me. Firstly is the Revlon ColourBurst Balm Stain in the shade 005 (Crush). 


This is a product which I purchased a little while ago in anticipation of Autumn starting! It's priced at £7.99 in Boots but I purchased it during a 3 for 2 offer across Revlon product, which they have started again now so it's a good time to go and get it! The lip stain has a beautiful gloss to it and applies very smoothly to the lips. The pointed crayon shape is ideal for getting into the corners of the lips so I don't require lip liner when wearing it. I find that the colour does need to be reapplied after eating, drinking etc but it does not wear off as quickly as other products that I've tried, so really not a bad choice if you're looking for something a bit less maintenance. It also isn't as drastic in colour as some of the other purples on the market, so if you are unsure about trying out darker shades this could be a good staring point. 

The second lip product is the Rimmel London Lasting Finish lipstick in shade 128 (Starry Eyed). 


As you can see, this is slightly more darker than the Revlon crayon but I'm all for dark purple lips! I purchased this for £4.99 from Boots and actually bought it because I had a MAC Creme Sheen shade (A23-Dare You) that I was really disappointed with & they were similar colours! Unlike the MAC lipstick, this one did not dry out my lips and was also much longer lasting. The lipstick itself is really creamy so applies nice & evenly, and I just love the colour! I do use a lip liner with this one (Rimmel London Lasting Finish- 1000 Kisses) to keep my lines neat & tidy. A good product with a very reasonable price tag!

Next up we move to the eyes, and this is quite a new purchase for me but one that I have used a lot already! It is the MAC Pro Palette refill pan eyeshadow in the shade Sketch, which was £10 (to be used in the Pro Palette).


I hadn't heard of this colour before, but since using it (and loving it!) I have had many compliments, and strangely enough the assistant that served me in MAC was actually wearing it herself when I purchased. It does look slightly brown in the picture which is annoying as in reality it is a beautiful deep shade of purple. The colour blends so well due to the high pigmentation and applies so evenly. It is the perfect shade for the A/W smokey eye and I can't recommend it enough! It's one that I will certainly be repurchasing throughout the season!

Finally I have chosen one for the nails, and this is a polish from Barry M in the shade RedBlack. 


If you have read any of my other posts you may have worked out by now that I'm a bit of a Barry M fan! Of all the colours I own (and believe me, there are quite a lot!) this has to be one of my favourites. It's an absolute steal at only £2.99 from Boots or Superdrug and there's normally always a 3 for 2 offer or similar as well. The colour is PERFECT for A/W, I'm just sad that I only tend to wear it in the colder months before swapping it for brighter shades in the Spring. I would say that you definitely need to apply 2 layers, as the first cost is a bit patchy & thin looking and is mainly a red tone. Once you have applied the second coat though you get the gorgeous dark colours coming through and achieve the result above. I adore the glossiness which really compliments the colour, and provided that you use a top coat the varnish does stay on for a very respectable amount of time. It really is a great product! 

That's it for my purple faves, I hope you enjoyed reading about them and maybe even try some yourself. Comment below with your favourite purple coloured products that you feel are missing, I'm very keen to try out some more!

Until next time xo

Thursday, 2 October 2014

September Favourites

Hello lovely ones!

It's time for the next instalment of monthly faves...and this month is full of some classic products that I can't get enough of! 


Firstly I'll start with Batiste Dry Shampoo in Floral & Flirty Blush. This should be a staple item for everyone's beauty collection, and is an old favourite of mine. It smells divine, and as with all Batiste product the packaging is gorgeous and girly! I use this on days when my hair could do with a wash but I simply haven't got the time to do so! I'm unfortunate in the sense that my hair is very dry on the ends but it seems to produce a lot of oil at the root, so I need to wash my hair every other day to avoid it looking greasy! This is my go-to for inbetween washes & a complete bargain as it lasts for so long. I've just repurchased this bottle from Superdrug and was lucky enough to catch their half price offer, so only paid £2.49 for 400ml. Perfect! The offer is still live online & in stores so go and grab yours quickly! 


My next favourite is something that has finally found its way into my collection! I'm talking about the Shu Uemura eyelash curler, which I purchased for £20 in my local Space NK store. I have heard people rave about these curlers time and time again, so finally gave in to see what all the hype was about! I have to say that I think the hype is well deserved! I'm not a big curler fan as I never seem to get any results with them, but I can really see the difference when I use these! They definitely lengthen my lashes (and evenly which is a rarity for me!), perfect for using before applying mascara/fake lashes.


Next up is the Nivea Sensitive 3in1 Micellar Cleansing Water. I actually first tried this because I received it in my Glossybox, but it's a product I would repurchase without hesitation. All of the main supermarkets & drug stores sell it for between £4-£5. The formula is designed to remove make up whilst deeply cleansing, and feels amazing on my skin. It's cooling, soothing & refreshing, and it's really nice to use a product that doesn't leave the skin feeling greasy. It's so light!! I suffer from dry skin on my nose (very annoying!) but since using this the dryness seems to have cleared up quite significantly. 10 out of 10 from me. 


Sticking with facial products, I've decided to include an old favourite of mine in this month's favourites. I first started using Johnsons 'Make Up Be Gone- Pampering' wipes a couple of years ago, but having recently run out of them & being without them for a week or so has made me really appreciate them again! There are 2 things that I love most about these. Firstly, the scent is divine. I usually adore the smell of all Johnsons product, it reminds me of clean & cuddly babies! These wipes do not disappoint in that area, my face always smells very good after using them (reading that back that's actually a really weird sentence, who smells their face?! But you get the idea!!). The second reason for me only wanting to use these is because of how moist they stay. My absolute pet hate with make up wipes is when they dry out in the packet, so when it comes to removing make up they are rough on your skin. It makes me SO MAD!!! I've never had this problem with these, all 25 wipes in the packet retain their moisture very nicely. I always purchase these from Asda as they almost always have them on a '3 packs for £6' offer. Worth every penny in my humble opinion!  


One for the eyebrows now! The HD Brows palette made it into my August Favourites, and now the pencil has made it in to this month's list! I opted for the shade 'Foxy' again to match my palette, as my hair is a light brown I don't want it looking too dark. What's great about this pencil is that the product applies really smoothly, and there is a sharpener built into the lid which is very handy! I simply use the pencil to outline the brows, which I then fill in with my powder from the palette. I couldn't believe what a difference the pencil made, it made the shape so defined and created much cleaner angles that I couldn't achieve with just the powder. It also makes it much easier for me to match both eyebrows!!! I'm so pleased that I started getting HD brows earlier this year, and the products for me to use at home in between appointments are the perfect range/brand extension. Top marks! 


Finally we come on to my last favourite of the month. This comes from L'Oreal, it is the Professionnel Mythic Oil and like the Nivea product I first came across this in my Glossybox (thanks Glossybox team!!). As previously mentioned, the ends of my hair are very dry and I find it hard to make them look healthy without chopping all of my hair off! This oil has actually started to work wonders for me though. I apply a few pumps evenly through the hair (leaving the roots and just concentrating on the mid-lengths to ends), it's best applied to damp hair so I use it once out of the shower. Because it's only a few pumps needed each time I find that the bottle as lasted me really well so far. It can be purchased for £15 from feelunique.com, along with the rest of the range which I must confess I have also gone on to purchase! I would recommend using this site as there is free delivery on orders over £30 and they are very quick to get the product to you. It also saves you lugging the products around in a carrier bag which could be a problem if like me, you want it all! Did I mention that it also smells amazing?! I love it a lot!


And that's it for my September favourites! I hope you enjoyed reading, and if last month was anything to go by then I will be writing my next favourite list in no time...where is time going??!!

Comment below if you would like more info about any of these products, and let me know how you've found them if you've used them. Would they make it on to your favourites list?! 

Until next time xo

Wednesday, 1 October 2014

This Blogger Bakes!

Hi guys,

As some of you may know, in the UK last Fridsy it was Macmillan Coffee Morning. 


For those of you who aren't aware of this, it's a fun & sociable way to raise money for Macmillan Cancer Support. Essentially it's a bake sale, and for every cake that is sold the money is donated to charity. Usually when these events come up, I am the one eating all the cakes that everyone bakes & donating money to do so, but this time I felt inspired to get even more involved & whip up some tasty treats myself. It must be all those episodes of Great British Bake Off rubbing off on me!

I decided to make the cakes slightly more adult friendly (basically, I put alcohol in them!) and wanted to make more than one flavour, so I settled on Lime Mojito cupcakes and Chocolate Baileys cupcakes. Here's how I did them....


For Lime Mojito cupcakes you need the following ingredients. 

For the cake mixture:
150ml of whole milk
250g self raising flour
250g caster sugar
Half a teaspoon of bicarbonate soda
3 limes
275g unsalted butter (left out overnight to turn soft)
4 medium eggs 
Sprig of fresh mint 
Half tbsp rum (not white rum)

For the icing:
300g unsalted butter (again left out to soften)
675g icing sugar
2 tbsp whole milk 
3 tbsp rum (not white rum) 
Muffin cases 

Makes 12 large cupcakes. 

Firstly, I'll start by saying that I was fortunate enough to use a mixer with these. Obviously if you are mixing by hand the times will inevitably be longer! 
I began by pre-heating the oven at 170 degrees (gas mark 3). I then poured the whole milk into a pan with the fresh mint and boiled it together for 4 minutes. This produces a minted milk which will help to create the mojito flavour! This needs to be left to completely cool, then sieve it into a bowl to remove the mint.


Next I created the cake mix. This involved putting all of the above cake mix ingredients in to my mixer slowly, starting with the self raising flour & butter. 


Next I added the caster sugar, eggs, milk & bicarbonate soda. This is all kept on a relatively low speed when adding the ingredients in, but once they all start to come together the speed can be increased. 


Finally I added in 1 and a half tablespoons of the minted milk, as well as 1 and a half tablespoons of the rum. If you wish to make these cakes non-alcoholic the rum can be replaced with lime juice!

Once the cake mix has been created, the mixture can be spooned evenly into 12 cases, I used muffin cases because although these cakes are classed as cupcakes they are large, and I would class them as muffin-sized (technical term obviously!!!).


Once evenly distributed, the cakes need to go into the pre-heated oven for 22 minutes. Once baked, they will be huuuuge, spongey & gorgeously golden! (Quick tip: to test that they are fully cooked once taken out of the oven gently press down on the top of the cake. This should spring straight back into place, as when it is spongey it is ready!). Leave this on a cooling rack to completely cool, as the buttercream icing can't be applied until they have.


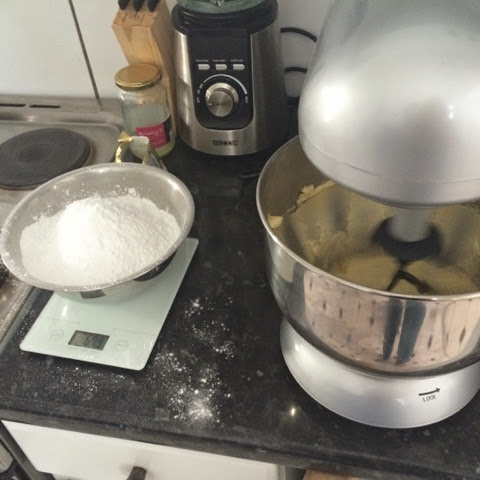
This brings us nicely on to making the icing! To do this you need to measure out 300g of the softened unsalted butter and 675g of icing sugar. 

Firstly, as crazy as this may sound you should sieve the icing sugar. This will smooth out the powder & remove any lumps, which you don't want ending up in the buttercream! (Quick Tip: To get any lumps through the sieve push the icing sugar down on the sieve using the flat end of a spoon, this will break up the lumps & make them into powder & therefore useable).


Add the butter to the mixer and beat for 3 minutes until completely smooth. You then need to take half of the icing sugar and add this to the butter. (As with the cake mixture, always start the mixing on a slow setting & then gradually increase the speed once the ingredients start to come together!). Beat these together for 3 minutes, then add in the second half of the icing sugar and beat together for a further 3 minutes. I recommend a taste test at this point...purely because it is delicious ;) The final stage of this is then to add 2 tablespoons of the minted milk produced earlier, as well as 3 tablespoons of rum. Be careful to stick to these measurements, as if you add any more the buttercream will be too wet and won't set properly. You can then take the bowl out of the mixer as you are now finished with it. 

Next you need to take the 3 limes & grate the zest from them. This is to be added to the buttercream mix just made, but the  zest needs to be folded in by hand using a large spoon. 


Once this is all mixed together that's your icing done! I would recommend at this stage putting it into a piping bag & then leaving it to set in the fridge for 10-15 mins, just to make sure that it is really firmed up & easy to pipe. 

By this stage, the cakes should be completely cool and ready to pipe! (Quick Tip: to test that the cakes are completely cool touch the base of them. If the base is still warm then leave for a bit longer & retest!). To pipe them, take the chilled piping bag and slowly begin squeezing (from the to of the bag) the buttercream into the centre of the cake. Start in the middle and slowly move around it in a circular motion, forming a mound of cream with a pointy top! (Think how an ice cream vendor creates a Mr Whippy...that's the movements you need!) 


Once completed, you can decorate to finish. I used lime sparkly sprinkles (picked up from a local supermarket) but you can also use some more lime zest created using the same method as before. 


And that's the Lime Mojito cupcakes finished...TA DAAA!!


To create the Chocolate Baileys cupcakes, the method and recipe are very similar. I actually created both flavours at the same time, just alternated and halved the ingredients! 

The ingredients for the Chocolate Baileys cupcakes are as follows:

For the cake mixture:
190g self raising flour
190g caster sugar
Half a teaspoon of bicarbonate soda
210g unsalted butter (left out overnight to turn soft)
3 medium eggs 
1 and half tbsp cocoa powder
2 tbsp Baileys
1 tbsp whole milk

For the icing:
300g unsalted butter (again left out to soften)
675g icing sugar
2 tbsp whole milk 
3 tbsp Baileys
100g milk chocolate 
Muffin cases 

Makes 12 large cupcakes. 

The method is essentially the same as before. Obviously for this one there is no need to infuse the milk, so I went straight into the cake mix. As before, I added in the self raising flour, caster sugar and butter to the bowl and mixed until smooth. I then added in the eggs, bicarbonate soda and cocoa powder and blended for 1 minute, until smooth. Finally I poured in 2 tablespoons of Baileys with 1 tablespoon of milk and blended. 


Once again, this mixture was spooned evenly into cases and placed into the pre-heated oven (at 170 degrees/gas mark 3) and baked for 22 minutes. 


Once cooked, these also need to be left to completely cool on a cooling rack, in which time you will be ready to prepare the buttercream icing! 


To make the buttercream, you need to use the same method as above, so sieve the powder first & beat the butter for 3 minutes. Next, slowly add the icing sugar to the butter, mixing for a further 3 minutes until smooth. You then need to add the 2 tablespoons of milk & 3 tablespoons of Baileys, and blend for a further minute. 

Spoon this mixture into a piping bag and leave to set in the fridge for 10-15 mins. 

Once the cakes are completely cool, it's time to pipe again! Use the same method as before, starting in the centre and working your way round.


To garnish these, I grated up the milk chocolate and sprinkled the curls on top of the icing (Quick Tip: When sprinkling use a spoon rather than your hands, as a spoon won't melt the chocolate!)


And here is the finished result! Yay!!!


Don't I look so proud?!! And I have to say, they were rather yummy too! Most importantly, they did the job and helped to raise lots of money for Macmillan, which is ultimately what this was about. If you would like to make a donation yourself, you can go online to www.macmillan.org.uk/Donate/ or call 0300 1000 200 


And that's it! Thank you for reading, I hope that you enjoyed it & even take inspiration from it! If you try these recipes out then please comment below letting me know, and send me pictures of the finished result! Also comment to let me know of any other cake recipes that I should try, and I will happily give them a go. Just call me Mary Berry.... ;)

Until next time xo
Related Posts Plugin for WordPress, Blogger...